Inception and Inspiration (Analog Morphing Core)
Recently I came up with a technology used on Kernom RIDGE overdrive pedal called Analog Morphing Core. This technology uses a single knob called MOOD, that can be seen in action in this link and the pciture below. It allows to change the shape of the signal going from a pure sinewave, to soft clipped asymmetric, then symmetric, then hard clipped asymmetric, then symmetric.
Additionally, this pedal includes PRE TONE and POST TONE knobs that allow to change and equalize the tone before and after the clipping stage.
I think that Analog Morphing Core technology must require some digital processing in order to use a single control knob to modify several resistance values in the clipping circuit. Digitially controlled potentiometers maybe? I don't know.
My goal was not to acquirately emulate the exact behaviour of this complex pedal, that probably required thousands of hours for its development, but I liked the idea of being able to generate hard / soft, symmetric / asymmetric clipping, and also the idea to be able to change the tone before and after the clipping.
So I decided to design and make a guitar pedal circuit that was able to include all these different functions: Pre-Equalizer (PreEq), Gain (G), Soft Clipping (SC), Hard Clipping (HC), Post-Equalizer (PostEq) and Volume.
Kernom RIDGE is a quite complex piece of equipment but I decided to go for simplicity using analog potentiometers... but is it really less complex?
Actually controlling all these function requires using lots of potentiometers, 12 in total!!:
3x 100kB for PreEq
3x 100kB for PostEq
1x 500kB for Gain
2x 10kB for Soft Clipping
2x 100RB for Hard Clipping
1x 100kA for Volume
Circuit Design and Simulation
For circuit design and simulation I use LTSpice. I will need a minimum of 3 opamps: one for PreEQ, one for Gain / Soft Clipping, and one for PostEQ, if I use two dual opamps, there is one left to be used as input unty gain buffer.
Equalizer
Pre and Post Equalizer will be identical circuits based on an opamp with Bass, Mids and Treble circuits:

Equalizer simulation, PreEQ + PostEQ Bass response:

Equalizer simulation, PreEQ + PostEQ Mid response:

Equalizer simulation, PreEQ + PostEQ Treble response:

Clipping section

Gain frequency simulation with no PreEQ, no PostEQ. 20 dB gain:

Gain transient simulation with no clipping:

Asymmetric soft clipping transient simulation at max gain:

Asymmetric hard clipping transient simulation at max gain and max soft clipping:
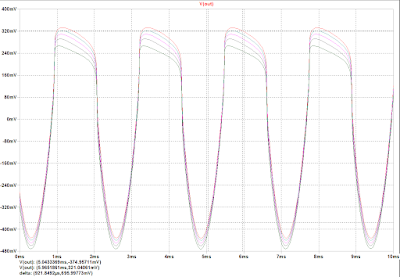
Symmetric hard clipping transient simulation at max gain and max soft clipping

Implementation

This is the bare PCB with components glued in, quite simple isn't it?

Well actually it was quite a nightmare to solder the wires, I had to be very quick and precise because if the component gets hot, the super glue will melt.
I used 30AWG wire wrap cable with one solid wire and thin insulation as this one

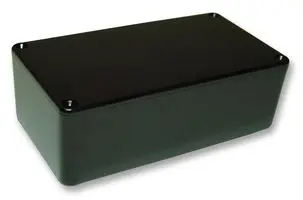
Usually I use Hammond type die cast aluminum boxes 1590B or 1590N1, which I personally prefer because it provides a bit more space, but this time I needed a bigger box to fit 12 potentiometers, the footswitch and an LED. I found a black ABS plastic box MB8 150 x 80 x 50mm that was just the side needed.
With all these simplifications, wasn't I risking to have poor shielding and being susceptible to get external noise and hum? Ususally a 2 sided PCB allows to have a full ground plane on bottom layer, so that all signals have good grounding and reference, But using wires I risked to create current ground loops that could capture external noise. The metal box is grounded and provides good shielding, but a plastic box can be exposed to external noise and capture 50 Hz hum, specially on a high gain pedal.
I added copper tape on bottom side of bare PCB connected to ground to try to improve grounding and shielding, and I was not sure I would need to internally shield the plastic box with copper or aluminum tape. At the end this was not needed and the pedal is not noisy.


Test

PreEQ frequency response


No Gain time response

SC1 at max


SC2 at max:

Gain at max:


Gain, HC1 and HC2 at max:

Gain and HC2 at max:

Gain, HC1, HC2, SC1, and SC2 at max

Gain, HC1 and SC1 at max:

Bypass:

I am very satisfied with the sound and the possibilities of this pedal, maybe too many tweaking knobs but it has a wide range of sounds from boost to overdrive to quite hard distortion without entering into fuzz zone. The pre and post equalizer allow to shape the tone as desired, compressing or increasing mids, providing more brightness or top end or making it sound fatter.