I am a big fan of shoegaze / noise rock bands and one of my favourites bands is Jesus & Mary Chain and their album Psychocandy. That album is well known for its unique and characteristic dense wall of sound with that white noise (switch-on vacuum cleaner, washing machine and all appliances and let them couple to the guitar amp) that served as inspiration for a coming shoegaze generation of bands: Ride, My Bloody Valentine, Cocteau Twins, Lush, Spacemen 3, Loop... and even today shoegaze bands like A Place To Bury Strangers, Skywave, Ceremony, Screen Vinyl Image or 93MillionMilesFromTheSun, The KVB, The Lost Rivers, The Soft Moon...
It seems that one of the keys of that sound is the use of a Shin Ei Fuzz-Wah (8 transistors) pedal. This is a two/three effects into one pedal, a 6 transistor fuzz with octaver (high octave) plus a 2 transistor Wah effect at the end. JAMC did not make lots of use of the Wah pedal as it is normally used, but they used it to reinforce the gain of a band in the mid tones to couple the sound, so they set the pedal at one position and didn't move it.
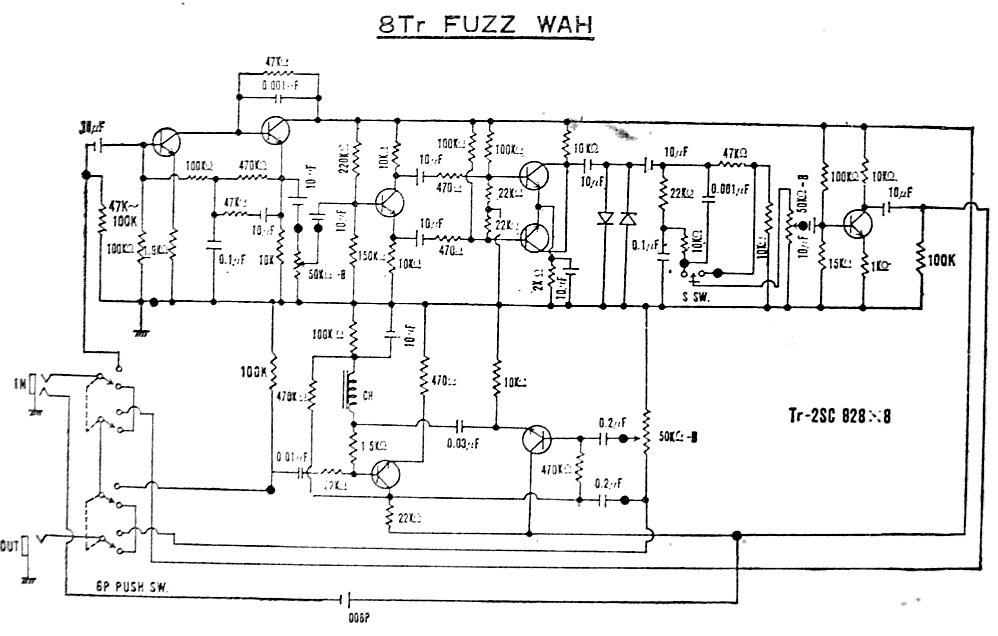
These are the schematics of the original Shin Ei Fuzz-Wah pedal:
The fuzz with octaver is also used on the Univox/Unicord Super Fuzz (6 transistors) pedal. See schematics here:

Find here a demo video of the Shin Ei Fuzz-Wah pedal:
With all that in mind I made a first version of the Super Fuzz with Octaver pedal with scrapped through-hole conventional components on a Vero board using 2N2219A transistors


The result was quite deceiving, the circuit has lots of gain and it was too noisy, too much, even for playing a PsychoCandy cover, specially when powered at 9V. A higher DC power of 15V reduced a bit the noise but it was still an undesirable result.
Schematics
(Update 23/08/2015: Source files on Github)
I decided to restart the work using surface mount devices (SMD), a professional PCB and include the Wah sections as well as several improvements and modifications to the original circuit.
These are the schematics of the Super Fuzz-Wah design:

I used BC847C high gain (hfe = 520typ) SMD SOT-23 NPN transistors.
The improvements on the circuit are the following:
- Replacing the two clipping germanium diodes by one dual BAT54S Schottky diode SOT-23 in series with 100 ohms (D1, R22).
- Replacing the Wah bulky and expensive inductor by a gyrator circuit based on a transistor (Q9) plus capacitor and biasing resistors.
- Doubling the 9V DC power supply, with a charge pump circuit based on Intersil ICL7660SCBA
The charge pump regulator ICL7660SCBA allows doubling the power supply from 9V to 18V, however this charge pump regulator uses an internal oscillator with a quite low and audible switching frequency of 10 kHz. If it is used in its default oscillation mode this frequency is seen as a ripple frequency on the power supply, since this pedal has lots of gain in its transistor circuits, this ripple noise can be amplified and heard as a very nasty and unpleasant high pitch noise. For that reason, it is absolutely required to short pin 1 (boost frequency pin) with pin 8 (V+) in order to get a higher switching frequency of 35 kHz, out of the audible spectrum.
Wah circuit simulation with LTSpice
(Update 23/08/2015: Source files on Github)
The following schematics shows both Wah circuits: to the right the original wah circuit based on an inductor, and to the left the circuit based on a gyrator circuit, where the inductor has been replaced by a transistor plus capacitor and biasing resistors. Basically the circuit framed by the square on the right side is replaced by the circuit framed by the square on the left.
The following schematics shows both Wah circuits: to the right the original wah circuit based on an inductor, and to the left the circuit based on a gyrator circuit, where the inductor has been replaced by a transistor plus capacitor and biasing resistors. Basically the circuit framed by the square on the right side is replaced by the circuit framed by the square on the left.


And this is the frequency response of the gyrator circuit when varying the potentiometer:

So we obtain a quite similar result with even a more stable gain peak.
PCB Layout
(Update 23/08/2015: Source files on Github)The PCB was made on two layers with dimensions of 80 mm x 50 mm:

Schematics and PCB layout was designed using Eagle CAD. The PCB layout can be uploaded into Eurocircuits website, and a quote can be obtained immediately, I paid 70 € for 2 boards prototypes in a 7 day turnaround, the quality is really good.
I purchased the components at Mouser website. You can find here the BoM, total cost of components for one prototype was 26 €.
To solder the components I used a low temperature (138°C ) CR11 solder paste Sn42Bi58 and a hot air soldering station, the results are very professional and clean. This is the finished PCB with all components (except external switches, jacks and potentiometers) mounted.

All the cables, jacks, connectors, switches and potentiometers soldered and ready for debug and verification

No comments:
Post a Comment